13 Tips to Reduce Glass Cutting Rejects
Glass cutting rejects can be a significant factor in production efficiency and profitability in any glass fabrication process. Poor cuts result in wasted materials, increased labor costs, and delayed deliveries. Paying attention to setup, maintenance, and technique details can make the difference between a successful and failing glass cutting operation. You can greatly increase yield and decrease waste being aware of the little things, such as proper wheel selection and alignment, fluid flow and breakout timing, you can significantly improve yield and reduce waste.
The following tips can help prevent premature breakout and improper breaks, ensuring high quality glass cutting results.
1. Cutting Wheel Selection
The angle of the wheel determines the depth and quality of the score. Make sure the cutting wheel you’re using is appropriate for the thickness of the glass.
Small diameter wheels (5/32 in / 3.96 mm): Ideal for scoring small circles, lenses, lighting fixtures, mirror patterns, and tight corners.
Medium wheels (7/32 in / 5.6 mm): Suitable for scoring straight line and larger patterns, such as automotive designs, large mirrors, and picture frame glass. These medium wheels generally offer the longest lifespan.
Large wheels (3/8 in / 10 mm): Designed for machines designed that apply heavy pressure scoring.
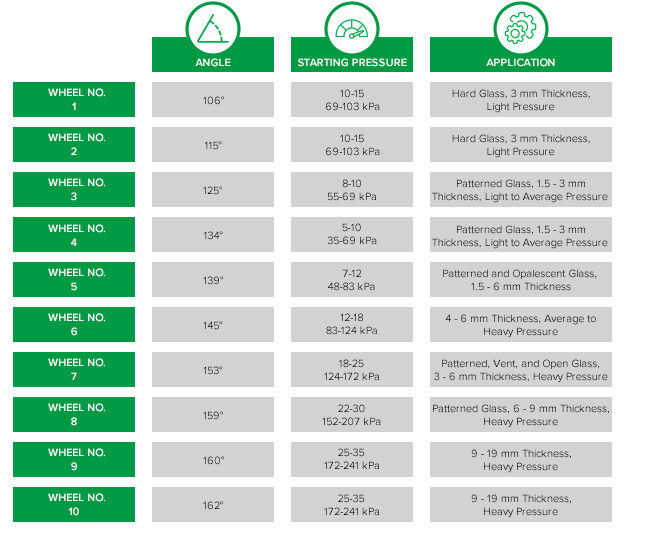
Refer to the Wheel Selection Chart to determine the best wheel and pressure for your specific application. Note that the chart is a general guideline and some experimentation may be necessary.
2. Cutting Wheel Condition
A worn cutting wheel can cause a poor score, which will lead to improper separation. Replace the wheel when it becomes dull or shows signs of wear. Follow a regular maintenance plan to maintain sharpness, rolling smoothness, and check for signs of damaged edges. Look for chips, flat spots, or excessive wear that could compromise scoring quality.
3. Air Pressure
Check that the air pressure is set for the correct wheel angle and glass thickness being scored. Refer to the Wheel Selection Chart to verify that your wheel angle, pressure, and thickness match the wheel being used. Incorrect pressure can result in insufficient scoring depth or damages to the glass.
4. Wheel Air Flow
Check that the air lines are free of kinks and flow restrictor valves are opened to allow air to reach the cutting wheel holder. If the air flow pressure is too high, adjust the head pressure needle value for reduced flow. Ensure consistent air delivery to maintain proper wheel performance throughout the cutting process.
5. Bind-Free Wheel Holder
In a self-aligning cutting wheel holder, be sure the wheel can swivel without binding. If the wheel holder is binding, clean the debris from the swivel area, check for worn bearings or bushings, and lubricate according to manufacturer specifications. A binding wheel holder will create inconsistent scoring pressure and poor cut quality.

6. Wheel Holder Alignment
If the cutting wheel holder is a non-swivel design, check that the alignment is directed towards the travel direction. To adjust alignment, loosen the holder mounting bolts, align the wheel perpendicular to the cutting direction, and retighten. Misalignment causes uneven scoring and premature wheel wear.
7. Cutting Fluid
Check that the fluid reservoir is filled and pressurized. Be sure to shut off pressuring air before opening the filler tube. Pressurize after filling by setting the reservoir air regulator to 1.5 PSI. Check that the fluid flow needle is properly adjusted to ensure adequate fluid disbursement along the score lines. The fluid should form a thin, consistent bead ahead of the cutting wheel. Adjust the needle valve incrementally until proper flow is achieved – too little fluid causes poor scoring, while too much wastes fluid and can interfere with breakout.
8. Timely Breakout
The score lines should be separated within a few minutes of scoring to prevent score line healing. Sub-plate cutting can alleviate bottlenecks and minimize healed scores when breakout cycle times are too long. Implement a first-in-first-out system to ensure consistent timing between scoring and breaking.
9. Surface Flatness
Ensure the cutting table and breakout table are flat. Check for swelling and depressions that can cause uneven pressure distribution. If swelling or depressions are found, adjust table supports, replace worn table surfaces, or use precise leveling equipment to restore flatness. Even the most minor surface irregularities can significantly impact cut quality.
10. Belt Alignment
All conveyor belts should rise simultaneously and be level when in the raised position. If belts are unaligned, adjust the belt tension mechanisms, inspect pulleys or bearings, and ensure each belt drive systems is properly synchronized. Misaligned belts can cause glass shifting during transport.
11. Belt Positioning
Conveyor belts should retract below the surface of the table during the scoring cycle. If belts do not retract properly, check the pneumatic or hydraulic actuators, air pressure settings, and inspect if mechanical obstructions are hampering the retraction. Belts above the table surface could interfere with the cutting wheel and create poor scores.
12. Transfer Height
The bottom surface of the glass should be approximately 1/32 inch above the breakout table surface when being transferred from the cutting table to the breakout table. If the transfer height is incorrect, adjust the table height mechanisms, check belt positioning, and verify that the glass support systems are properly calibrated. Incorrect transfer height can cause glass damage during handoff.
13. Table Air Flow
Check whether the air flotation sufficiently eases the movement of glass onto the breakout table. If air flow is inadequate, check the blower filter for blockages, air valve adjustments, and the air delivery system for clogs caused by glass powder or other debris. Clean any debris with a shop vacuum and change air filters as needed. Proper air flotation reduces friction and prevents glass scratching during movement.
Success in glass cutting lies in consistent application of these practices and ongoing performance monitoring. Start by addressing the most common issues in your operation, wheel condition, pressure settings, and timing. Then work through the remaining points systematically. Small adjustments can yield significant improvements in reject rates.
By paying close attention to the mechanical and environmental factors that contribute to the scoring and breaking, not only can you reduce waste, but also improve product quality, extend machine life, and improve the safety and efficiency of your workspace. Ultimately, reducing glass cutting rejects is not a single focused change, but rather, mastering the details and commitment to continuous improvement. When every aspect of your process is dialed in, precision and profitability follow.
Looking for more information? Reach out to our support team or call 724.452.7390 for 24 | 7 | 365 support.
