
Glass Washer Optimization Guide
Several factors influence glass cleaning, including water quality, maintenance, the type of glass, plant environment, and upstream and downstream processes. Achieving clean glass can vary depending on daily conditions and from one plant to another. Following consistent practices is essential for maintaining quality output.
Pre-Spray Zone
Glass can carry various types of debris when entering the washer, such as lucor, dust, and edge grinding fines. The primary purpose of the pre-spray section is to remove this loose debris before the glass reaches the first pair of brushes, preventing potential scratches. Additionally, it helps remove contaminants early in the process, ensuring more consistent cleaning results. This step is especially critical when a grinder or polisher is positioned before the washer.
It is also essential to have a properly designed and adequately sized filtration system to capture the loose debris, preventing clogging of spray lines or nozzles.
Optimal Washer Performance
Beyond a well-constructed glass washer, like the Billco Z-Series, there are four key factors to ensure optimal clean glass results.
Heated Wash Water and Detergent
The washing section of the machine is a critical step in the glass cleaning process. As the glass moves through this section, it must be free of all debris and dirt. The only substances that should remain on the glass during this section are trace amounts of detergent and wash water solution, which can easily be removed in the rinsing sections.
Heated water enhances cleaning effectiveness by helping to dissolve residues, loosen contaminants, and activate detergents more efficiently. The result is improved surface cleanliness and drying performance. Depending on the type of glass and coatings, wash water temperatures should be maintained between 110°F and 140°F.
Detergent is the most effective method for ensuring complete removal of all oils from the glass lites. These oily residues are hydrophobic, meaning they repel water, so without detergent, they will remain on the surface and can interfere with coatings, adhesives, or sealants applied later. Detergents contain surfactants that break down and lift oils, allowing them to be rinsed away easily, resulting in a streak-free, crystal-clear finish. Dilute detergent in warm water according to the manufacturer’s instructions, typically using a concentration of 1–2%.
Washer detergent must meet the following requirements:
- Non-foaming and easily rinsed.
- Effective in removing cutting oil and Lucite packing materials.
- Does not damage or deteriorate the glass, metal, rubber, or nylon components of the washer.
- Be compatible with all coatings on glass.
Billco recommends using a mildly acidic, non-foaming liquid or powder detergent. For coated glass, contact the coating supplier for detergent compatibility. Billco’s detergents are available at the Billco Parts Page.
Quality Rinse Water
After the glass passes through the heated wash section, it proceeds to the rinse sections of the washer. The first rinse removes any remnants of the wash solution. The glass is then passed through the final rinse before being conveyed to the drying section.
The water used in the final rinse must be as clean as possible. Any contaminants present in the rinse water could compromise the quality of the final product. Substances such as minerals will leave residue on the glass, causing visibly dirty glass.
Water contains minerals such as calcium and magnesium. These minerals, when they evaporate on glass, leave a white or grayish chalky residue. In areas with high mineral content, this residue can form streaks as it exits the washer. In addition to detracting from the appearance, these minerals can also cause issues for interlayers and other films and coatings.
To prevent streaks and minerals on glass, treated water should be used. Softened water replaces the hardness ions with sodium ions; however, sodium can also result in spotting and streaking, making it less ideal. For optimal results, utilize Deionization (DI) or Reverse Osmosis (RO) systems. DI completely removes all total dissolved solids (TDS), while RO removes 95% of TDS. These processes eliminate the minerals that would remain on the surface of the glass during the drying stage, preventing streaking and spotting caused by the minerals in the water.
Maintenance Program
Glass washers are commonly overlooked in maintenance programs. Many operators assume that visually clean glass indicates proper machine function. However, with high-performance coatings, the cleanliness of the glass is much more critical and consequently requires greater attention to washer maintenance.
Vitally important to the longevity of a glass washer, and more importantly, for achieving consistently clean glass, is maintenance. The cleanliness of the glass coming out of a washer is directly related to how well the machine is maintained.
There are five important maintenance events in a good maintenance program.
Daily
- Check the water in each tank to determine if it needs to be replaced. All tanks should be drained, thoroughly rinsed, and refilled with clean water. The frequency of water changes depends on the volume of glass being washed and the type of contaminants present. High volumes of glass fines, heavy contamination, or critical cleaning applications require frequent changes. After draining, always rinse the tanks thoroughly before refilling them with fresh water and adding detergent.
Week One or After Long Span
- Tighten fasteners, including electrical connections
- Grease the machine with only one or two pumps of grease into each fitting.
There should never be grease on the outside of the bearing housing. Excess grease can dislodge the bearing seals, allowing moisture in and leading to bearing failure. Care must be taken to keep oil and grease off rolls, brushes, and belts. Excess grease must be wiped off as soon as possible to prevent contaminating the machine.
- Check for proper motor rotation. A blower running backward will produce some air at the air knives, but not enough for optimum glass drying.
Once a Week or Every 40 Hours
- Check the water in each tank to determine if it needs to be replaced. All tanks should be drained, thoroughly rinsed, and refilled with clean water. The frequency of water changes depends on the volume of glass being washed and the type of contaminants present, but it should be done at least once per week. High volumes of glass fines, heavy contamination, or critical cleaning applications may require more frequent changes. After draining, always rinse the tanks thoroughly before refilling them with fresh water and adding detergent.
- Drain detergent and rinse tanks. Clean tanks and removable screens thoroughly. Fill tanks with new water and add detergent.
Immersion heaters used in tanks are mounted horizontally near the tank bottom to allow convective circulation. They are located high enough to be above some sludge build-up at the bottom of the tank. When the heaters are turned on, the entire length of the heater should be immersed in water at all times. Scale build-up on the blades of the heater and sludge on the bottom of the tank must be eliminated. If not controlled, it will inhibit heat transfer to the liquid and even cause overheating and failure of the heater. Care should be taken to ensure silicone lubricant does not come into contact with the heater blades. The silicone will prevent the “wetting” of the blades by the liquid, act as an insulator, and possibly cause the heater to fail.
- Check air filters; if light shines through, replace them.
- Lube pinch roll drive gears. If you have an older washer with steel gears only
- Sparingly grease all pinch roll bearings in the wash and rinse sections.
Every 250 Hours
- Grease brush and roll bearings.
- Perform standard 40-hour maintenance.
Every 500 Hours
- Inspect brushes and rolls for any damage or glass chips.
- Check brush adjustment.
- Check the condition of the drive system and adjust as required.
- Thoroughly clean all rolls.
- Lightly oil the chain with a quality 30 Weight petroleum oil without additives.
- Lightly oil the brush bearing guides, pinch roll adjustment screws, and brush idler pulley slides with a light machine oil.
- Check grease level in gear reducer.
- Remove plugs in ends of spray pipes and clean out with wire brush, bore cleaner, and drill bit.
- Clean line strainers in the in-line pump filters if equipped with them.
- Clean air filters and inside the air tubing, by sliding a thin piece of metal back and forth in each air knife slot to dislodge any debris, then blow out.
- Clean the inside of the washer to remove dirt, grease, and slime with a low-pressure sprayer and hot water. Be careful not to spray bearings, motors, and other water-sensitive components, and never aim the sprayer nozzle directly at the brush bristles.
- Perform 40-hour and 250-hour maintenance.
Roll Covering and Brush Bristle Condition
Brush Maintenance
Proper maintenance of brush bristles is important in maintaining effective cleaning and prolonging equipment life. Over time, improper adjustment can lead to premature wear, reduced cleaning performance, and costly replacements. The steps outlined below are recommendations for keeping brushes in optimal condition and achieving consistent cleaning results.
- Check adjustment so no more than 1/32 in (0.7 mm) of bristle is touching the glass. Excessive bristle contact with the glass causes a “mopping” action instead of a “brushing” action. This mopping action results in reduced scrubbing of the glass and excessive bristle wear.
- Use the entire width of the conveyor when loading glass. Load glass alternatively on the right, center, and left.

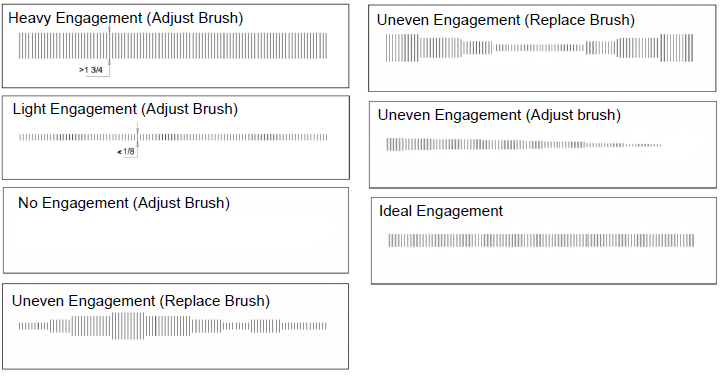
Placing glass in the same location repeatedly causes uneven wear across the brush bristle surface, reducing cleaning effectiveness over time. When the brush is unevenly worn, it can no longer be adjusted and needs to be replaced.
Roll Maintenance
Good roll condition and adjustment are critical to consistent glass handling and finishing. Improper roll pressure or damaged roll surfaces can cause defects such as marks or streaks, compromising overall quality and increasing risk of downtime. The following guidelines help ensure rolls perform optimally and extend their service life.
- Adjust the top pinch rolls so they make light contact with the lower conveyor rolls. The full weight of the top rolls must never rest on the bottom rolls. If this happens, flat spots will develop in the rubber covering of the roll, which can cause marks on coated glass.
- Rolls in the drying and unloading sections must be clean and free of cuts or gouges. The glass is clean when it leaves the last rinse brush. If there is any debris on the drying section rolls, it will be deposited on the clean glass. Cuts or gouges in these rolls can cause water streaks on the glass in the drying section.
To keep your machine running efficiently and to avoid costly downtime, it’s essential to follow a regular maintenance schedule. Proper care not only prolongs the life of your equipment but also ensures consistent product quality. Find a copy of your machine’s specific maintenance plan in the manual. Need a copy of your manual? Reach out to our Support Team.
Advanced Optimization Techniques
Slime in Glass Washer
Why is there a build-up of slime on the inside of my glass washer?
Slime occurs primarily when using treated water. DI or RO water lacks chlorine, allowing algae growth similar to an unchlorinated swimming pool. Bacterial growth appears as slime on any surface exposed to treated water.
There are several ways to minimize this bacterial slime:
- Place an ultraviolet light in the treated water plumbing system. This light will kill bacteria in the water only when the water is being recirculated. It will not kill bacteria when the water is not flowing through the system.
 Make sure there are no dead legs in the water plumbing system that will permit the water to become stagnant. Do not allow water to remain in tanks overnight or weekends.
- Drain and wipe down the internal surfaces of the re-circulating tanks each day when the machine is finished operating. Use a mild detergent for wiping and then flush well with clean water.
- Once a week, clean all the internal metal surfaces of the machine that are contacted by treated water, including the tank, sheet metal surrounding the rollers, and brushes, using a low-pressure steam cleaning machine.
- A chlorination procedure can be used to reduce algae growth. This procedure uses a 5% solution of plain, unscented household bleach, periodically recirculated through the washer. There is a precise rinsing step that must be followed with this procedure.
 Make sure there are no dead legs in the water plumbing system that will permit the water to become stagnant. Do not allow water to remain in tanks overnight or weekends.
Consider Billco’s BioClean Water Care System for automatic sanitization to reduce bacteria growth and maintenance requirements.
Drying Section Maintenance
When operating an IG line, operators will turn the glass over when it exits the glass washer, so the top surface coming out of the washer is then on the inside of the IG unit. Operators do not have confidence that the bottom surface coming out to the washer will always be spot-free. More often than not, the root cause is inadequate maintenance of the washer’s drying section.
In addition to keeping the rolls in the drying section perfectly clean and free of cuts or gouges, internal cleanliness of the drying system is very critical. The blower contributes a large amount of contamination to the washer. Using high-grade air filtration and keeping the entire drying section, including the internal blower housing, tubing, and air knives, as clean as possible will prevent the drying section rolls from leaving dirt on the glass.
Glass washers are often located in environments with airborne oil mist. To minimize contamination, the air surrounding the blower should remain as clean as possible. It should be kept away from processing equipment, aerosol, or paint sprays, and exterior doors that can introduce oil mist into the air. Any of these can contaminate the internal surfaces of the drying system and place a film on the glass. Keeping the drying section clean is as important as keeping the water clean and free of minerals.
Immersion Heaters Maintenance
When cleaning the tanks, it is important to pay special attention to the electric immersion heaters. These heaters are mounted horizontally near the bottom of the tank to allow convective circulation and are positioned above any sludge that may accumulate. When in operation, the entire heated length of the immersion heater must remain fully submerged in water at all times.
Scale buildup on the heater blades and sludge at the bottom of the tank must be regularly removed. If left unchecked, these deposits can reduce heat transfer efficiency, potentially causing overheating and premature heater failure.
Additionally, extreme care should be taken to avoid getting silicone lubricant on the heater blades. Silicone prevents proper “wetting” of the blades by the water, acts as an insulator, and can lead to heater malfunction or failure.
Static Elimination
Static elimination can build up on the glass as it passes through the machine due to the rubber-covered rollers, nylon bristles in the brushes, and the high velocity of air rushing through the air knives. This can cause handlers to get shocked when unloading glass or leave a light coating of dust on the glass. To prevent this, contact our Solutions Specialist to add the Static Elimination System to your machine. This kit consists of a pair of specially designed bars and a 110-Volt power supply. The bars are mounted above and below the pass line, immediately after the drying section. As the glass passes between the bars, the static charge in the glass is drawn off.
Low-E Glass
There are two types of Low-E Glass: Pyrolytic coating and Vacuum coating. Pyrolytic or hard coat is sprayed on the semi-molten clear glass during the float glass manufacturing process. For washing purposes, a pyrolytic glass coating has the same physical properties as clear float glass. Vacuum coating, also known as soft coat, is applied to clear float glass in a multi-vacuum chamber process, sometimes after the float glass is produced. In general, vacuum coatings require more care during washing than pyrolytic coatings or clear float glass. Cleaning Low-E coated glass requires specialized features and a dedicated approach to maintaining the glass washer in optimal condition.
Cleaning Procedures:
- Keep the washing system clean.
- Ensure washer is adjusted properly, with a minimum of roll and brush pressure.
- Roll covering in the last rinse and drying sections must be perfectly smooth and clean, with no cuts, gouges, or other imperfections.
- Clean and clear spray lines, holes, and nozzles.
- Use a detergent that is tested with samples of the coated glass.
- Use 140°F (60° C) wash water temperature.
- Never stop the glass part way through the washer.
- Treated rinse water is recommended in final rinse.
- Raise cold glass to room temperature before processing.
Addition Vacuum Coatings Procedures:
- Brushes with softer than standard bristles should be used in the washer.
- Glass washer cleanliness, adjustments, and condition are critical.
- Clean the internal sheet metal surrounding the brushes, inside the tanks, and water collection pans once a week with low-pressure steam. Direct high-pressure water contact on the bristles will cause matting and lead to premature brush replacement.
- For best cleaning results, the glass should be washed within 2 hours after cutting.
Detection System:
Install a detection device on the load conveyor to assure that the Low-E coated surface is always facing upward as it is processed through the washer. This is a straightforward and effective method for minimizing errors.
Clean Glass Inspection
To ensure the glass surfaces are suitable for the next fabrication step, several inspection methods can be used as the glass exits the washer.
Intense Light for Visual Inspection:
The most common glass inspection method. It uses fluorescent lights beneath the off-load conveyor to detect heavy stains and marks that are 10 microns or larger. It can also see defects that would be noticeable when installed. However, it cannot detect light stains. It is important to double-check Low-E glass, as marks are more visible on coated glass than clear glass.
Water Break Test:
Wet a section of glass with mineral-free water. A beading action will indicate that the glass is dirty. Note that this method cannot detect minerals or salt deposits.
Steam Test:
Apply steam to cooled glass. Contaminated areas typically show water vapor patterns.
Water Droplet Contact Angle:
This method detects films or contaminants that have a different surface energy than the glass. A piece of hardware reads the droplet angle with precision. Note this method typically requires a test lab, and only a small area can be tested at a time.
Dusting with Titanium Dioxide Pigment Powder:
To perform this test, use a piece of dark colored, privacy glass. Hand clean the glass vigorously with a solvent, then run the glass through the glass washer. Apply powder using a blush brush, as if looking for fingerprints. Contaminants and water relief patterns from the air knives will be apparent if dirty. Keep in mind that this method typically requires a test lab, and the results can be difficult to interpret.
If marks are detected during these tests, the next step is to determine their cause. Scratches, smudges, streaks, and other defects usually originate from different parts of the machine.
Scratches can be caused by glass chips in rollers or brushes, or by sagging spray pipes. It’s possible that the issue happened before washing, such as from the seaming tables.
Smudges are typically fingerprints, glue from stickers left on the glass, or dirty marks on rollers, especially rollers in the drying area.
Squiggly streaks are commonly minerals in the rinse water being dried on the glass in the drying area.
Stains are usually caused by condensation forming on the glass during shipping or storage. In most cases, these stains have permanently changed the surface of the glass and cannot be removed by brushes or chemicals.
Random marks can be glass defects, debris falling onto the glass in the drying section or offload conveyor, or droplets of algae falling onto the glass in the rinse section.
Repeating marks are usually caused by dirt or an oily mark on a roller in the drying or off-load section. The distance between the marks usually corresponds to one revolution of a roller. The marks are generally in a parallel line. Determine what surface the mark is on, and the direction of the mark, as it relates to the conveying direction. It is necessary to remove a mark by scraping it with a fingernail, or vigorous rubbing with a rag. It is unlikely that the glass washer brushes will remove it.
Dyne Pens:
To perform a dyne test, you should first prepare the test sample by placing it on a level surface. If the sample’s temperature differs from the ambient temperature, allow it to stabilize. Next, choose an ACCU DYNE TEST™ marker pen that has a dyne level you believe is slightly lower than the test sample’s. The pens should be acclimated to the ambient temperature.
To apply the ink, press the applicator tip down firmly on the material until it is saturated with ink. Then, using a light touch, draw the pen across the test sample in two or three parallel passes. You should disregard the first pass and evaluate only the last pass. This ensures the test fluid layer is thin enough for an accurate measurement and flushes any contamination from the tip.
After applying the ink, evaluate the results. If the last ink swath remains wetted out for three seconds or more, repeat the process with the next higher dyne level marker. If the ink beads up, tears apart, or shrinks into a thin line within one second or less, repeat with the next lower dyne level marker. If the ink swath holds for one to three seconds before losing its integrity, the dyne level of the marker closely matches that of the sample. Finally, you should test at least three points on the sample, such as 1/4, 1/2, and 3/4 across the surface. It’s important to note that this procedure does not consider factors such as surface topography, coating rheology, chemical compatibility, or surface particulate count/size.
Troubleshooting
Having issues? A good place to start for diagnosing problems is the troubleshooting guide included in the machine’s maintenance manual. If a solution cannot be found, reach out to the Billco Support Team at 724.453.2310.
Conclusion
Consistently clean glass doesn’t happen by accident; it’s the result of careful attention to washer setup, water quality, maintenance, and process control. Whether operating a high-performance machine like the Billco Z-Series or another washer model, understanding how each factor, from heated wash water and detergent selection to roll care and static elimination, affects final glass quality is key to maintaining peak performance.
By implementing a structured maintenance program, using proper detergents, managing rinse water quality, and controlling contamination sources, can significantly reduce defects, prolong the life of the washer, and increase the reliability the finished product. Glass washer upkeep is an investment in operation’s quality and efficiency, make it a daily habit, not a reactive task.
For additional support, reach out to our Support Specialist.
Check out more tips.
